When you’re just starting out and learning how to curve text in Procreate, it can feel a little frustrating to realize there’s no built-in curved text tool. You might want your words to flow gracefully around a circle, follow the edge of a ribbon, or wrap neatly under your illustration — but the text just sits there, perfectly straight.
Don’t worry — there’s a creative workaround for everything in Procreate! In this guide, you’ll discover three easy and artistic ways to curve text in Procreate, plus helpful brush tips, lettering ideas, and design tricks to make your typography pop.
Whether you’re creating digital lettering, designing posters, or growing your art brand, these simple methods will unlock new creative freedom and help your text move beautifully with your artwork.
Table of Contents
✨ Why Curved Text Adds Magic to Your Digital Art
Curved text does more than just look cool — it brings flow, movement, and balance to your composition.
Think about it: a circular quote around a moon illustration, a logo that follows a curve, or a banner-style text wrapping along a ribbon. Each example feels natural and dynamic — and that’s exactly what curved text can do for your artwork.
Curved lettering also pairs beautifully with Procreate brushes like watercolor, calligraphy, or textured brushes. With the right tools, you can turn ordinary words into design elements that feel alive.
Here are a few ideas where curved text shines:
- Logo design with circular layouts
- Quote art or motivational posters
- Product packaging mockups
- Stickers or greeting cards
- Social media banners and highlight covers
If you’ve ever wanted your text to dance across your canvas, this tutorial is for you.
🧭 How to Curve Text in Procreate – Step-by-Step
You’ll learn three methods — each with its own level of control and creativity.
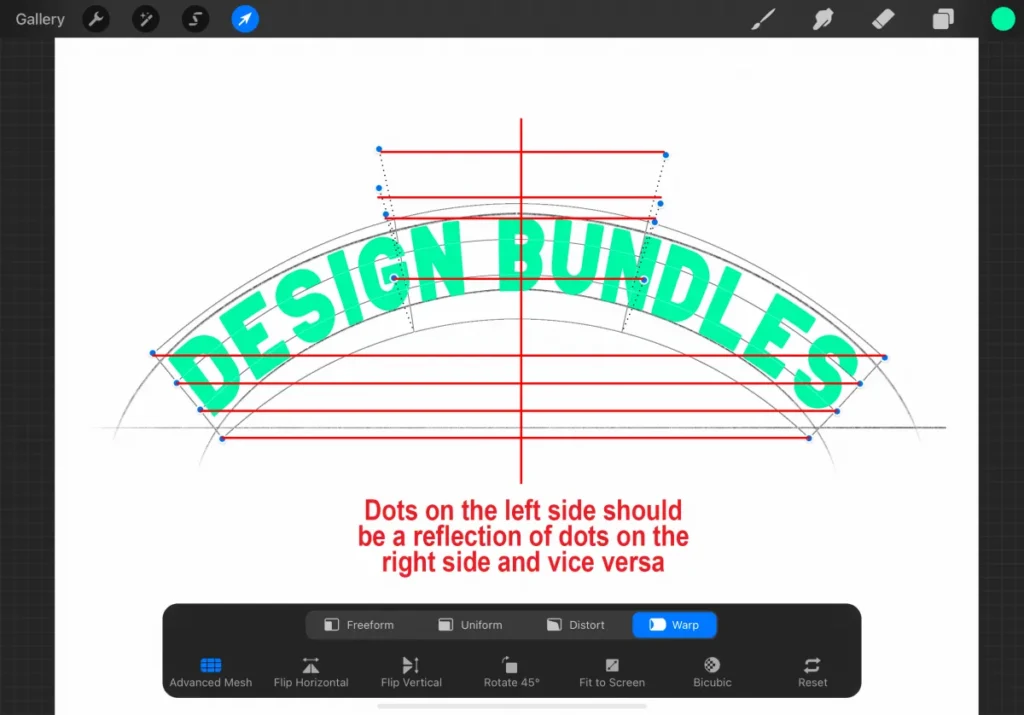
🌀 Method 1: The Warp Tool Technique (Beginner-Friendly)
If you’re new to Procreate, this is the easiest and fastest way to curve text.
- Add your text:
- Tap the wrench icon → Add → Add Text.
- Type your words using the keyboard.
- Adjust the size, font, and spacing until it looks right.
- Flatten the text layer:
- Rasterize it so you can edit it freely.
- Use the Transform Tool:
- Tap the arrow icon (Transform tool).
- In the menu below, select Warp.
- You’ll now see a mesh grid appear over your text.
- Start curving!
- Gently drag the center or bottom mesh points downward to form a smooth curve.
- For finer control, toggle Advanced Mesh — this adds more nodes you can move for subtle shaping.
💡 Pro tip: Make small adjustments and zoom in often. Smooth, subtle curves look more natural than dramatic ones.
🌈 Method 2: The Arc Guide Technique (Precise and Clean)
This method is perfect if you want a smooth, professional curve.
- Create your arc guide:
- Tap the wrench icon → Canvas → Toggle on Drawing Guide.
- Tap Edit Drawing Guide and adjust the grid size.
- Use the brush tool to draw a symmetrical arc on a new layer (use “Edit Shape” to refine it).
- Position your text:
- Add text on a new layer and drag it roughly over your arc.
- Use the Transform tool to align it with the curve.
- Fine-tune the fit:
- Adjust letter spacing (kerning) so the words follow the curve evenly.
- Hide your guide:
- Turn off the arc layer when done — your text should look naturally curved.
This technique gives you perfect control and works beautifully for digital lettering, badges, and product mockups.
🪶 Method 3: The Letter-by-Letter Technique (For Hand Lettering Artists)
If you love custom lettering or logo work, this is your go-to method. It takes more time — but the results are worth it.
- Add your text in all caps (it’s easier to manipulate).
- Use the Selection Tool (S icon) → choose Freehand or Rectangle.
- Select one word or letter at a time.
- Tap the Transform Tool and move, rotate, or tilt each letter to follow your curved path.
This technique gives you total artistic freedom — you can adjust every letter’s angle, spacing, and size. It’s also great for ribbon lettering or vintage-style logos.
💡 Tip: Pair this method with textured or free watercolor brushes for Procreate to make your lettering look hand-painted and organic.
Pro Tips for Perfect Curved Text
Combine Brushes and Lettering
You can elevate your curved text by using custom brushes that add texture and depth. Here are a few brush types to try:
| Brush Type | Best For | Look & Feel |
|---|---|---|
| Watercolor Brushes | Soft curves, natural flow | Organic and fluid |
| Calligraphy Brushes | Elegant lettering | Smooth and controlled |
| Texture Brushes | Bold artistic effects | Handcrafted, gritty finish |
💡 Try layering different brush strokes for unique results — for instance, use a watercolor base, then a texture brush for highlights.
Keep Your Workflow Smooth
- Always keep a copy of your original text layer before warping or rasterizing.
- Use layers to adjust curves without losing flexibility.
- Export your final curved text as a PNG so you can reuse it across different artworks.
- Add shadows or highlights for extra dimension — it’ll make your curved text pop.
Recommended Procreate Brush Sets for Lettering & Curved Text
Whether you prefer soft watercolor lettering or bold typographic styles, having the right brushes makes a huge difference.
Here are a few brush sets to explore:
- Free Watercolor Brushes for Procreate – Ideal for blending soft colors and creating hand-lettered effects.
- Ink Calligraphy Set – Great for smooth, precise lettering.
- Texture Lettering Pack – Adds artistic flair and grit to your typography.
If you love experimenting, check out my Etsy shop [IconicdesignerLaden] — I share brush sets and design resources made for artists who want their work to stand out.
Creative Ways to Use Curved Text in Your Art
- Circular Logos: Perfect for brand designs and digital badges.
- Quotes: Wrap motivational words around an illustration or shape.
- Stickers & Cards: Make your lettering pop with a gentle curve.
- Social Media Posts: Add curved titles for eye-catching reels and posts.
The best part? Once you master this, you’ll start seeing new ways to use curved text everywhere.
Conclusion – Let Your Words Flow
Now that you know how to curve text in Procreate, the creative possibilities are endless. You can add rhythm, personality, and flow to your lettering — no fancy plugins needed.
Experiment with these three techniques:
- Warp Tool for quick results.
- Arc Guide for clean precision.
- Letter-by-letter for true artistic freedom.
Pair them with your favorite Procreate brushes, play with texture and color, and let your typography become part of your story.
✨ Ready to take your lettering further? Download my free watercolor brushes for Procreate or browse premium sets on my Etsy store. Your next masterpiece is just a curve away.
FAQ: How to Curve Text in Procreate
Q1: Does Procreate have a curve text feature?
Not yet, but you can easily create curved text using Warp, guides, or by adjusting letters individually.
Q2: Can I use Procreate brushes with text?
Yes! Convert your text to a rasterized layer, then paint over it with any brush — watercolor, ink, or texture — to add unique flair.
Q3: How do I install new Procreate brushes?
Download the .brushset file, tap it in your Files app, and it will automatically import into Procreate.
Q4: What are the best brushes for curved lettering?
Watercolor, calligraphy, and textured brushes all work beautifully — experiment to find your favorite.
Q5: Where can I find free Procreate brushes?
Check creative communities, digital art blogs, or visit my shop IconicdesignerLaden for free and premium sets made for lettering artists.
💌 Join my creative circle!
Sign up for my newsletter to get free brush sets, Procreate tips, and exclusive updates for digital artists. Because your art deserves the best tools — and the freedom to curve beautifully.